Thursday, December 16, 2010

Choo Choo Cookies

Last NIght we attended grandson Max's Christmas Program. Max is in PreSchool and I made these Choo Choo for him to share at the after party. Each Christmas Season, I make them for our neighbors and they are always a hit.


Gingerbread never tasted so good!  Here's the recipe....skootch on down the page to see how they get built...
GiNGeRBReaD CooKieS
Prep: about 30 minutes
Chill: 3 Hours or so
Bake: 5-6 minutes 
Oven: 375〫F
Makes 3-4 dozen small/medium cookies or 15 large train cookies

1/2 cup shortening
1/2 cup granulated sugar
1teaspoon baking powder
1 teaspoon ground ginger
1/2 teaspoon baking soda
1/2 teaspoon ground cinnamon
1/2 teaspoon ground cloves
1/2 cup molasses
1 egg
1 tablespoon vinegar
2 1/2 cups all purpose flour 

1 recipe of Powered Sugar Icing
assorted candies as desired... for these, I used candy Spearmint Leaves, Red & Green M & M's

Please Note:  I use my heavy duty KitchenAid Mixer as this is a very dense dough. It mixes all of the dough, without having to add any by hand. Just be sure to switch to the bread dough kneader when adding the flour!


1. In large bowl, beat shortening with electric mixer on medium to high for 30 seconds. Add granulated sugar, baking powder, ginger, baking soda, cinnamon, & cloves.  Beat until combined, scraping sides of bowl occasionally. Beat in molasses, egg, & vinegar until combined.  Beat in as much of the flour as you can with the mixer. Stir in any remaining flour.  Divide dough in half. Cover and chill dough (I put the dough in larger zip-lock bags) 
about 3 hours or so.

2.  Lightly grease cookie sheets and set aside.  On a lightly floured surface (I use a hugh plastic cutting board for this part), roll half of the dough at a time until 1/8 inch thick,  Using a cookie cuter, cut into desired shapes.  Place 1 inch apart on prepared cookie sheet. I cook 1 sheet at a time in the center of the oven. 

3. Bake in a 375〫oven for 5-6 minutes or until edges are lightly browned.  Cool on cookie sheet for 1 minute.  Transfer to a wire rack and let cool.  If desired, decorate cookies with Powdered Sugar Icing & Candies.  ENJOY!

  PoWeReD SuGaR ICiNG  

Start to Finish: 10 minutes
Makes: 1/2 cup

1 cup sifted powered sugar
1/4 teaspoon pure almond flavoring
2-3 tablespoons milk  

In a small bowl, combine powdered sugar, almond flavoring & milk.  Stir in additional milk, 1 teaspoon at a time, if needed to reach spreadable consistency.  

Note:  You may substitute Vanilla flavoring, for the Almond flavoring if desired. 


Gather Ingredients....

Mixing, Mixing, Mixing. 
The Mighty KitchenAid at work....Lovin' My Power Tools

 Divide and Conquer!
Then, off to do a bit of Chillin' in the Fridge.

After chilling, roll out to about 1/8" and cut your shapes. 
Don't be a slow poke, you do not want unchilled dough!

Out of the oven and stacked, after cooling on wire racks.

Choo Choo's decorated with Icing, Spearmint leaves
 (cut in half, so that they are not so thick),
& red and green M& M's.

 Holiday Express!


All Wrapped up in cello bags and tagged for the Big Event!

Merry Christmas from Max!
compliments of his Nana


Sunday, November 28, 2010

Three Wise Women

Three Wise Women Mug
Three Wise Women Apron
Three Wise Women Tote
Introducing My                                              Three Wise Women Collection                A sassy, modern version of The First Christmas, enliven everyday items, bringing a bit of humor to a hectic holiday season.                  Three Wise Women... would have asked for directions,  arrived on time,  helped deliver the baby, cleaned the stable, made dinner and brought practical gifts. And on the way home they would have said:  Did you see the sandals Mary was wearing with that gown? Can you believe that they let all of those disgusting animals in there?  That baby doesn't look at all like Joseph.         Available now!    http://www.zazzle.com/sandygrossmanmorris                       Click on the above link to view the entire collection!  


Sunday, September 26, 2010

How To Make A Crib Sheet

We have a new baby arriving in the family very soon and today found me sewing 2 crib sheets.  I'm making them from 1 double size fitted sheet that was a lucky find at a local thrift shop.  It was new & it was a Pooh Print, matching the nursery decor!   $4  Yay!

NOTE:  a double sheet makes 2 crib sheets!  

Amazingly simple, I thought that I'd share how I made them.  

MaTeRiaLS FoR 1 CRiB SHeeT
  
45" x 70" fabric (Prewash)
48" of 3/8" elastic, cut into four 12"long pieces
thread to match
scissors, sewing machine, ruler

ease level:  lots simpler than it appears
cost: so much less than store bought
time required: 30+ minutes, depending on skill level.

note: it took just over 30 minutes for me to make 2 crib sheets, which included photo time.  
I used my serger (6,000 stitches per minute!) and that speeds things up a whole lot.
 I also used my Black & Decker electric scissors....I am so in love with power tools!

INSTRuCTioNS


#1
Cut fabric to size.  
If using a double size sheet, cut in half, side to side (NOT LENGTHWISE!) You will be making one crib sheet from the top half and another crib sheet from the bottom half.

~~~~~~~~


#2
If using a sheet, as I did, remove existing elastic, cutting close to the elastic.

Skip #2 if you are not using a sheet!
~~~~~~~~


#3
Cut & remove a 9" x 9" square from each corner.
Note:  If you are using a sheet, you can leave the 2 corner seams as is. Just cut the 2 remaining corners.

~~~~~~~~


#4
Fold over the corner, right sides together, as shown.
Repeat for each corner
~~~~~~~~


#5
Sew each corner closed, as shown.  Stitch twice, as these are the pressure points that need to withstand a lot of wear and tear when you take them on and off the mattress. 

#6
Either serge all around the edge of the sheet, or sew a small hem all around, your choice.

~~~~~~~~


#7
Find the center point of one 12" length of elastic and sew it to the center of your corner seam. 

~~~~~~~~


#8
Then, sewing from the center seam, stretch out your elastic while you are sewing.  Flip, and stitch the other half of the elastic, following the same instructions. 
Be sure to use a zig-zag or an elastic stitch so that you have a stretchy corner!
Repeat for each corner.

~~~~~~~~


Your corners should look like this!

~~~~~~~~


And, here are my 2 completed crib sheets!
Final Cost: about $2 each. (I had elastic in my stash)


e-mail me if you have questions... 
If I've inspired you, please send photos. 
I'd love to see them!


Wednesday, August 18, 2010

My Custom Needlepoint Canvases

My friend and fellow stitcher, Janet Perry, is currently featuring a series of articles about my Custom Needlepoint Canvases on her blog. Grab a cup of tea or a frosty glass of lemonade and head on over to www.nuts-about-needlepoint.com  and learn how I can turn your photos or artwork into a fantastic needlepoint canvas!  Janet has a wealth of information on her blog...go check it out!  

HeRe aRe 2 CuSToM CaNVaSeS THaT MaY iNSPiRe You!


You can also drop by my website: www.sandygrossman-morris.com to see what I have created for others, plus some "work-in-progress" pix....they're bound to inspire you!  While you are there, browse through my Needlepoint Gallery of Designs.  Time to get stitching on holiday decor and gifts for those special people on your gift list.


In the meantime, I've got to get back to my project table and finish up my latest collection.

 Enjoy the day!


Thursday, July 15, 2010

Peek vs. Peak

OMG! It was just pointed out to me that I incorrectly used peak, instead of "peek" in my last blog...yup, I sure did. Thank you Persnickety!  Although, I sure could use a vacation right about now, so maybe, subconsciously, I really did mean Peak!  I fixed my error and truly hope that Persnickety will return for another peek in the future.... From My Little Corner of the World, Sandy

Wednesday, July 14, 2010

I'm a Celebrity!

Well, sort of.  I am the featured guest on the blog "Nuts About Needlepoint" by Janet Perry, internationally acclaimed needlepoint stitcher and a dear friend.  Janet asked me to write a series of articles about my Custom Needlepoint Canvases and Part One begins today. Thank you Janet!!! Over the next few weeks I'll be back on her blog for more sharing. 
 Pop on over to her blog to learn more about my Custom Needlepoint Canvases.

You can also get more information about Custom Needlepoint Canvases on this page of my website   http://www.sandygrossman-morris.com/sandygrosman-morris.com/Custom_Needlepoint_Designs_by_Sandy_Grossman-Morris.html

Related Blog:
August 19, 2009  Look What The Mailman Brought!

  
Scroll to the bottom of this page for a peek at some of my needlepoint designs.  
My Needlepoint Designs are available at Shops all across America. 

Monday, June 21, 2010

Where I Create!

Welcome to My Little Corner of The World...literally!  My Studio is located in the upstairs southeast corner of our home. It's where I spend most of my days, at my project table, designing needlepoint canvases, jewelry, home decor and a bit of clothing & accessories.  I also add to my website, do my bookkeeping and so much more! (My cousin, Sharon, is soooo jealous!!!)  I'll cover the general areas here, then I'll add a link to a page for more details and a floor plan! I still have a bit of "decorating" to do, what fun that will be!
A chalk board sign on the door welcomes visitors....


to "Where I Create"
My studio is divided into specific areas surrounding a central PRoJeCT TaBLe. As a birthday present, my husband, "Bob the Builder" presented me with cabinets of my choice...(did I score, or what?).  So, off to the drawing board I went.  After drawing a set of room plans, which included windows, door, closet, electrical outlets, etc., I made a list of what I actually would be doing in this room, such as designing, sewing, crafting, bookkeeping and so on.  Then, I made lists of what items would be needing space, like my computer, printer, sewing machines, etc. and included the amount of real estate they would require. I knew that I would need as much wall space for cabinets as was available, for storage.  A list of "Must Haves" vs. "Like to Have" emerged.  Several weeks later, the cabinets were ordered.  Bob the Builder installed laminate flooring, and with help from family we also installed the cabinets and the Formica counter tops which were special ordered, due to the configuration of the cabinets.  Beautiful...but the contractor white walls on the new house were boring!  A coat of light sage green goes well with the cider shade of the oak cabinets and the Carbon Black (a Kelly Moore color) is perfect for grounding everything.  It is the blackest of blacks that I have ever come across.  I picked up a gallon of it in an eggshell finish to use on the table legs, frames and shelving.  Love it.  


 MY PRoJeCT TaBLe... is in the center of the room, it's Bob the Builder's kitchen table from his bachelor days.    My next goal is to sand the top and stain it to match the cider shade of the cabinets.  This table was a "Must Have".  On it, I design my needlepoint canvases, cut out sewing projects, make jewelry and do crafts.  It is "Where I Create".  When my sisters, cousins and friends visit, this is "Where We Create" and of course, solve all of the world's problems! 


Behind these doors there is a ton of SToRaGe...


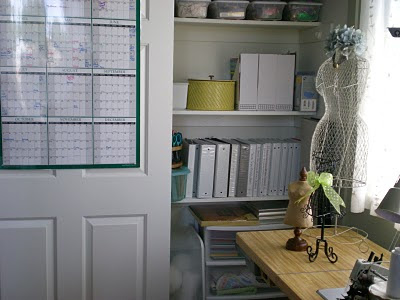
GeNeRaL SToRaGe...Although I am not a huge fan of plastic storage drawers, they work well in this closet.  All of the fibers and threads are stored by color. Clear shoe boxes hold a wide variety of things, all labeled to more easily identify the contents within! In them I store things like glue, paints, brushes, tapes, glitter.....less used items in the boxes are stored on the higher shelves. 


More GeNeRaL SToRaGe... in the right side of the closet, along with my catalogs.  Again, more shoe boxes for storage above and plastic drawers below.  Very efficient!  I dislike hunting for things, it's time wasted for me.  I'd much rather be spending that time creating something.  Also, when guests are here, I share.


MY SeRGiNG STaTioN...it's commercial, a real power tool and this big boy stitches about 6,000 stitches per minute.  It also gathers.  Am I lucky or what? When it's not in use, I display my little collection of dress forms on it.  It is across the room from my SeWiNG CoRNeR, but I wasn't willing to give up valuable wall cabinets in order to place it closer. It works fine here. 


Moving on, clockwise....PaPeR CeNTRaL
This where I store, cut, punch and copy. 
And, where I store all kinds of paper and envelopes, along with stickers!


Specialty Paper is stacked lightest weight at the top, heavier weights on lower shelves.


CoMPuTeR STaTioN!
This is where I fell in love with MAC...my new Snow Leopard.


BooKKeePiNG
Keepin' it simple. Need I say more?
I just added the curtains...shears with cotton embroidery.  A bit of girly girl without the fuss. 


Clear lucite wall files to the right of my desk area, appropriately labeled, keep me on track!


BeaDS & BauBLeS 
Go from here to the PRoJeCT TaBLe in under 2 minutes (really!), and back in just a bit more time.  They're home is in the uppermost section of this huge cabinet that is to the left of my BooKKeePiNG area.


Oh, the fun begins!  I love using vintage beads & such.  Then it's on to their next chapter in life. 

  
Below BeaDS & BauBLeS is where I keep my FaBRiC STaSH.  Neatly folded, stacked stair step style and placed in bins by color makes life so much easier when I am looking for just the right piece of fabric to use in a project.  If I don't have anything that will work, I know it quickly and can head to my favorite haunts for a bit of fabric shopping.  There's a full dozen of these bins in this cabinet!  I've tried many different ways to store fabric throughout my life and this way has proven to be the most effective solution for me. HINT: Keep an eye out at Thrift Stores and Estate Sales for clothing made from awesome fabrics or have really wonderful buttons. 


SeWiNG CoRNeR
 Everything I could possibly want or need to get really creative with this little baby is located in the surrounding cabinets.  Bob the Builder built in halogen lighting under the upper cabinets, so I can even sew late at night.  (Sometimes I think he regrets installing them!)


Upper Left Cabinet holds electrical cords, sewing machine accessories and threads...labeled with my handy dandy DYMO labeler, which is another of my favorite power tools.  Jars hold buttons, straight pins, safety pins, etc.. My sewing machine is about 14 years old, but still works great and it embroiders.  I would LOVE to have one of the newer embroidery models, but it's not high enough on my "Must Have" right now. 


Upper Right Cabinet in the SeWiNG CoRNeR is filled with notions and my vintage lace collection.  I cut cardboard squares to fit these bins...a Target purchase for $1 each, then wound the laces, ribbons, cording, piping, etc. around them.  I can see at a glance what I have as I search for just the right piece to add to a project. Again...I used my labeler to identify the contents of each bin.  


DeSiGNiNG aT THe PRoJeCT TaBLe
It just takes a minute to spread out my pencils, paper, a vintage Tulip Sundae Glass full of erasers, french curves and other necessities, and I'm ready to embark on another design adventure.


PRoJeCT TRaYS
I have 2 types: plastic (L) $1 at the Dollar Tree and porcelain on metal (R) found at thrift type stores. I have a several of the plastic ones and 3 of the metal ones.  These are the greatest non-power tool ever invented.  The plastic trays are great for projects-in-progress and can be stacked (sometimes!) to take up less room on the shelf.  I have several...creative guests love to use them, too. The high sides keep beads, buttons, etc. corralled.  The metal trays are used for small item painting, gluing and when using a glue gun. Paint washes off easily and glue just pops off!  Most importantly, the metal is a safety factor when using a hot glue gun...it doesn't burn!  They pack well in a suitcase, I've hauled them all over the states.
I fear boring you with all of my storage ideas at one time.  
Please return to see more of My Little Corner of the World. 
Thank you for stopping by.  I hope that you will leave a comment (so that I visit you!) and  
become a follower. 

Sunday, June 6, 2010

It was an EPIC PARTY!

It was a fabulous Grad Party and as promised here are the Candy Bar Photos!  Alex was so pleased, proclaiming it an "EPIC PARTY".  Guests arrived from near and far to celebrate the BIG DAY with Alex.  Of course, the Candy Bar was a complete success. After browsing throughout the afternoon, guests loaded up  "several for the road" in personalized boxes.  I made the stickers for the boxes in Photoshop and included the who, what, when, why and where in various fonts (color: white).  I used a hot pink background and added a lime green border to keep with the color scheme.  
For the candy signs, I again used various fonts, this time in black ink, printed on hot pink card stock. Grammy and I layered them on glittery lime green card stock for an extra punch of color. As you may notice, we used various ribbons, plus flip flop and flower foam stickers to decorate the individual candy signs and glass containers. Totally cool! And, it was so fun for the two grandmothers to spend an afternoon of creativity!
We used encyclopedias to create various heights for the larger containers, covering the whole table with layers of (new) hot pink bath mats, beach towels and scarves.  A skirting of tightly gathered white netting turned out to be a good choice. Chrome chargers were placed under some of the large containers and a few well placed black items, such as the graduate silhouette and a decorative dress form grounded everything and made the pinks and greens really pop.
You can see the pix to the right, but if you want to see larger photos...scroll to the bottom of the page for a better peek. 
If you have any questions...e-mail me! I do share ideas, and am willing to send specific photos if requested.  How about creating a Candy Bar for your next event?  Choose a theme, pick out your colors (2 to 3) and go shopping!  
Congratulations Alex, We Love You!

Sunday, May 30, 2010

Another Milestone Reached

Our Granddaughter, Alex, will be graduating from high school very soon.  Her other grandparents, Grampy & Grammy will be hosting the after grad party at their home in the Sierra Mountains.  I am helping Grammy with the Candy Bar.  For those of you not familiar with what that is...come on back for a visit in a week for the photos.  Believe me, it will be worth the trip!  Her colors are HoT PiNK & LiMe GReeN, and what fun we are going to have shopping for those colors....!  


The invitation arrived in the mail and I wanted to share it with you.  My daughter, Susan, (MOG - Mother Of the Graduate) designed and printed them.  Yes, Alex's eyes are THAT blue!  They have not been touched up. Everything but her eyes was taken to black & white (well sort of!).  Alex will be heading to culinary school later this summer.  She is the resident chef in our family and her latest creation was the beautiful 3 tier wedding cake for the marriage of her sister, Krystiana.


Friday, May 21, 2010

Book Markers for the M.O.B. Squad


I made these Book Markers for the M.O.B. Squad to use in their favorite Cook Book..."An apron is like a woman.  The bib is the bosom, the skirt is the lap, the pocket is the purse.  And like an apron's human counterpart, it is the variations on these parts that make each one unique."